Essential Fascial Chain Training — Hip, pelvic & spine foundation routine
Your pelvis is the structural center of your entire body. Every force your body produces or absorbs passes through it. These exercises target the four key fascial chains that control pelvic stability — building the foundation your spine depends on.
Full Routine — Follow Along
How to Practice
New movement patterns take time and repetition — not intensity.
1
Big Bang full routine
2
Pick one stretch to practice (light practice)
3
Big Bang full routine
4
Pick one stretch to practice
Practice 2–3 days per week. These workouts should never be followed by anything more strenuous than a light walk. Your body needs time to integrate what it’s learning. More is not better at the beginning.
Individual Exercises
Practice each movement separately
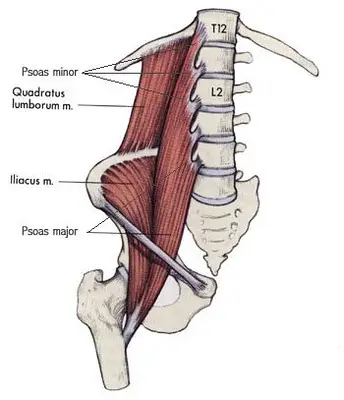
Iliopsoas MFS
Your primary hip flexor — connects your hip, pelvis, and spine. The deepest and most influential structure in your pelvic foundation.
You're remodeling the four fascial chains that control your pelvic stability — from your primary hip flexor (iliopsoas) through your deep pelvic stabilizer (obturator internus) to the gluteal muscles that support everything above and below.
Each structure has its own compensation pattern. Each exercise addresses that specific fascial chain — restoring length, tension, and proper function so your pelvis can do its job as the foundation for your entire body.
This isn't just stretching. You're reprogramming how your body organizes around its structural center.
Iliopsoas Hip flexor → pelvis → spine
Obturator Int. Deep pelvic stabilizer
Glute Min. Pelvic support + hip stabilization
Glute Max. Hip extension + pelvic control
L5/S1 ELDOA Spine-pelvis integration
What's Next
Your body will tell you.
Pay attention to where you feel restriction when you practice. That's your roadmap.
If your hips feel tight, your pelvic foundation needs work — that's what Big Bang addresses. If your mid-back feels compressed, that's the next section of your spine to address. If your neck is restricted, your cervical spine is compensating for something below it.
There's no rush. Stay with this program until your body tells you it's ready for more. Your movement portal has everything you have access to — start where your body points you.
Your primary hip flexor — connects your hip, pelvis, and spine. The iliopsoas is the deepest and most influential structure in your pelvic foundation. It affects three linking areas of your body, making it one of the biggest bang-for-your-buck muscles to work on. It is used extensively, along with the Rectus Femoris, as the main hip flexor during walking, running, biking, etc. This and the Rec Fem are great to do right after these activities.
Factors of Progression
Level 1 — The Posture
Kneeling setup with pelvic tuck
Kneeling on one knee with its back foot to the outside of the hip as far as possible. Turn the toes toward your glute and push the heel more toward the outside. The other foot is in front with its knee angle bigger than 90 degrees. Hands on the ground between the legs. Tuck the pelvis while keeping the hips square. Then slide your body weight toward the front foot.
Level 2
Hands up to front knee
Come up with your hands on your front knee. If you are unstable, use a yoga block, a wall, or a chair to steady yourself. No wobbling!
Level 3
Arm reach with forward slide
Reach your kneeling-side arm out in external rotation, wrist in extension, and push your arm away from your body. Then try and slide your body forward leading from your pelvis, keeping what you set up.
MFS
Obturator Internus
Parameters
Hold Time / Reps
3 x 30 sec each side
5+ min each side for passive hold
What You're Working & Why
The obturator internus is part of the pelvic-trochanter muscle group, along with the obturator externus, piriformis, quadratus femoris, and the gemelli muscles. The obturator internus and piriformis are the two muscles that are part of your pelvic floor, along with the levator ani and the coccygeus muscle. The fascia of the obturator internus — the obturator fascia — provides the attachment for the levator ani muscles, making it a key structural component of your pelvic floor.
Passive Hold
Passive Position
Support and hold
Set up in the posture and simply hold it — no active engagement, no additional actions. Just support yourself in the position and let gravity do the work. Hold for 5+ minutes each side.
Factors of Progression
Level 1 — The Posture
90/90/90 setup
Start in the 90/90/90 position — 90-degree angle at the working side, groin, and non-working side. Your working side is the internally rotated leg — the one with the inside of the knee touching the ground. If the inside of the working-side knee hurts, slowly pull your heel toward your butt and lean back and away from the working side until the pain is basically gone.
Level 2
Arch, get tall, and slide
Pull your toes and top of your foot toward your shins and turn the working side foot toward the ceiling. Arch your lower back (stick your butt out) and get tall. Then slide your body weight over your working hip and turn your torso toward your working knee.
Level 3
Arm reach in external rotation
Reach your working-side arm out in external rotation, or both arms out in external rotation. If you are struggling to maintain your torso position with both arms out, go back to the working-side arm only.
MFS
Glute Minimus
Parameters
Hold Time / Reps
3 x 30 sec each side
What You're Working & Why
The glute minimus is the deepest muscle in the glute complex, which also includes the glute maximus (deep and superficial) and the glute medius. It has a direct connection to the Rectus Femoris, making these two muscles great to work together.
Factors of Progression
Level 1 — The Posture
90/90/90 with torso rotation
Start in the 90/90/90 position — 90-degree angle at the working side, groin, and non-working side. Your working side is the externally rotated leg — the one with the outside of the knee facing the ground. Pull your toes and top of your foot toward your shins and turn the non-working-side foot toward the ceiling. Turn your torso to face your outside knee, making sure your sternum and inside knee are in the same plane. Your torso needs to be over top of the thigh.
Level 2
Pelvic tuck, arm reach, and bow
Tuck your pelvis and chin. Reach the opposite-side arm out in external rotation, or both arms out hard. If both arms is too difficult, stay with the single arm. Then bow your torso toward the inside knee of the working side. Push the thigh down to the ground as you bow. Push your knee forward and your hip away from each other.
MFS
Glute Max Deep
Parameters
Hold Time / Reps
3 x 30 sec each side
5+ min each side for passive hold
What You're Working & Why
The glute max deep and the piriformis are the primary muscles that help manage your sacrum. The glute max is your primary hip extensor and the most powerful muscle in the body — when it's turned on. It attaches to the sacrum and connects through the thoracolumbar fascia up the spine, making it part of the fascial chain that links your sacrum to your occiput. Keeping this muscle balanced and functional is essential for pelvic stability and spinal health.
Factors of Progression
Level 1 — The Posture
Cross-leg setup (passive or active)
For passive: place both feet on the wall — the higher the feet, the easier. Cross one foot outside of the other knee, ankle outside of thigh/knee. Butt stays down. Hold for 5+ minutes each side. For active: same cross-leg position but bring your legs off the ground and grab under your knee (easier) or on top of your knee (harder). Butt stays down.
Level 2
Anchor and engage
Anchor your posture by pulling your sacrum (butt) down, neck down, eyes looking toward the belly button, and get tall. Then simultaneously pull your knee toward your same-side shoulder and push your elbow into your knee.
ELDOA
L5/S1
Parameters
Hold Time / Reps
30 sec each factor of progression
1 x 1 min for full ELDOA
5+ min for passive hold (Level 1 posture)
What You're Working & Why
To have a healthy, strong, vibrant, well-moving lower back, your L5/S1 joint needs to be open, aware, and strong. Even in a healthy back, it needs consistent preventative work to stay balanced. Most people who experience lower back pain have compression or restriction here. This exercise creates space at that specific joint.
L5 / S1
Factors of Progression
Level 1 — The Posture
Set up and hold
Legs on the wall, sacrum on the ground, knees soft (bent), torso lined up so your body looks like the letter L. The most important part is that your sacrum stays on the ground. If the back of your legs are too tight and your sacrum comes off the ground, bend your knees more and move further from the wall.
Level 2
Flatten spine, butt to neck
Pull your entire spine flat against the ground from sacrum to cervical. Eyes down — try to look at your belly button. Getting tall. This is the most important part of the active exercise.
Level 3
Lower limb engagement, heels toward ceiling
Pull your toes toward your shins and turn your feet inward. Rotate your entire leg inward and pull your knees toward the wall. This engages your lower limb fascial chain. Push your feet toward the ceiling while your sacrum stays on the ground.
Level 4
One arm back at a time
Reach your arm toward the ceiling, then externally rotate it. Bring the arm back toward your head — the goal is next to your ear, just above the ground. Once there, push away from your body from your armpit. Practice one arm at a time.
Level 5
Full ELDOA
Combine all factors of progression simultaneously. Spine flat, lower limbs engaged with feet pushing toward the ceiling, both arms back by your ears pushing away from your body. Hold for 1 minute. This is the complete expression of the ELDOA L5/S1.