Back Pain

Why Your Spine Isn’t Rehydrating Overnight — and What to Do About It

disc hydration ELDOA. Illustration of a yellow sponge between two vertebrae with water droplets rehydrating the spine — metaphor for disc hydration through ELDOA and TV Stretching.

💡 Your spinal disc doesn’t just “recover” with hydration while you sleep. It responds to what you do before you rest.


🟠 Your Discs Aren’t Lazy — They’re Just Dehydrated

Most people think spinal health and disc hydration is a waiting game: take the pressure off, rest a bit, and hope the body “fixes itself.” But that mindset overlooks one of the most basic truths of physiology: structure needs input.

Your intervertebral discs — the soft cushions between each vertebra — don’t have a direct blood supply. They rely entirely on your movement, posture, and hydration mechanics to stay supple and healthy. If you’ve ever felt stiff or achy in the morning despite a “good night’s sleep,” there’s a reason for that.


🧠 The Science of Disc Hydration — in Plain Speak

Discs rehydrate in two ways:

1. Passive Rehydration (Osmotic Pressure)

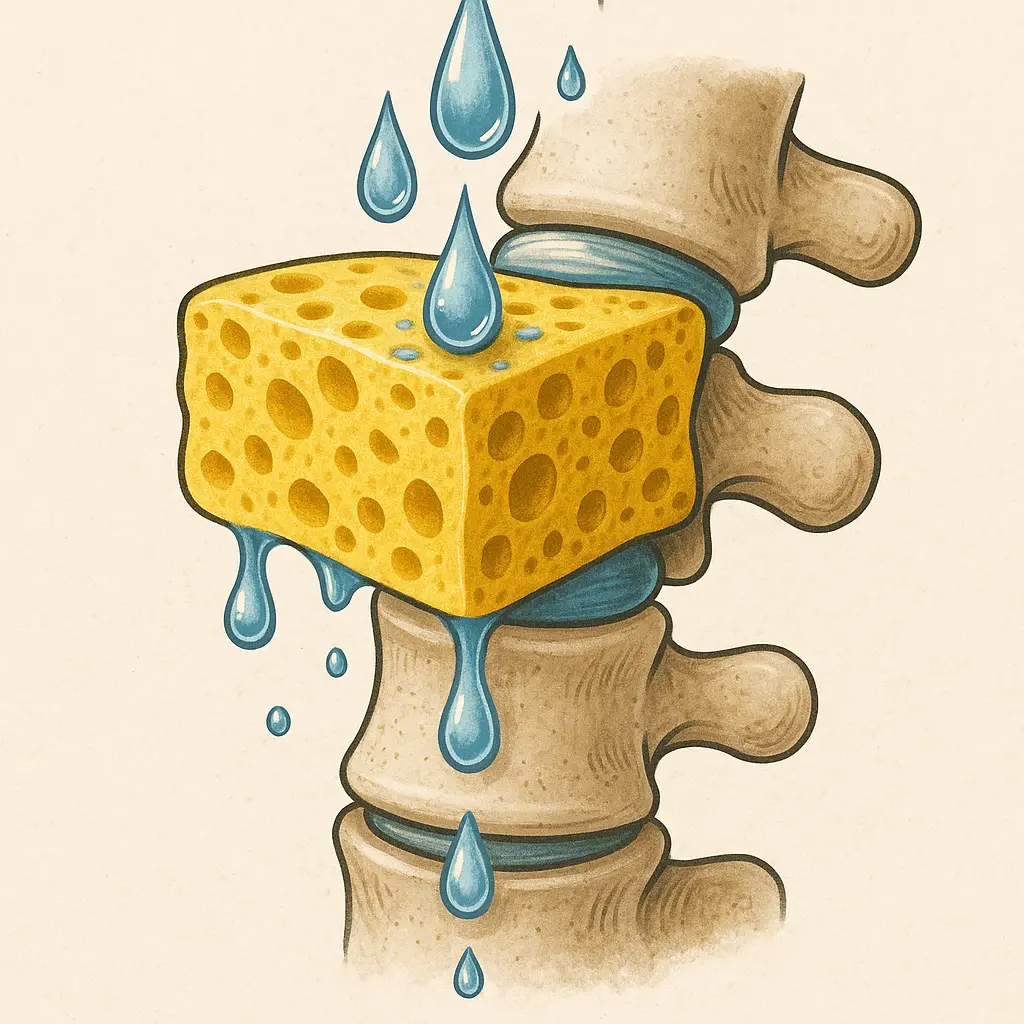
When you lie down at night, gravity is removed. This creates an osmotic gradient — water is slowly drawn back into the discs. Think of it like setting a sponge in a shallow bowl of water. It’ll eventually soak in… but only as much as its tissue allows.

2. Active Rehydration (Mechanical Stimulus)

When you de-coapt your spine through targeted movement — like ELDOA stretches — you create negative pressure and fascial tension. This primes the disc to pull in more fluid. It’s like squeezing and releasing that sponge right before soaking it — it absorbs far more water when prepped this way.


🌙 Why ELDOA “TV Stretching” Works So Well for Disc Hydration

“TV Stretching” is the term we use for doing your ELDOA decompression work 1–2 hours before bed. This timing allows you to:

  • Decompress your spine actively
  • Prime your discs to absorb water
  • Then follow it with passive overnight rehydration

You’re combining two mechanisms, not relying on just one.

This is especially effective if you’re dealing with:

  • Degenerative disc issues
  • Postural compression from sitting or lifting
  • Chronic stiffness that doesn’t resolve with sleep alone

🛠 Try This Tonight: 2-Step Reset (L5/S1 Focus)

Before bed, try this:

  1. Get into the L5/S1 ELDOA position, but keep your knees bent.
    This protects the popliteal artery, which runs behind the knee and can be compressed during long-duration stretches with extended legs.
  2. Stay in the posture passively — just hold the position and breathe for 5, 10, or even 15 minutes.
    You’re not actively reaching or tensioning yet — just letting the spine settle and decompress through position alone.
  3. Then do a single, focused ELDOA hold — no more than 1 minute.
    Engage the full fascial lines. Create vertical tension. Be precise.
    (Too long and you’ll reverse the effect — ELDOAs are about quality, not duration.)
  4. Lie down and rest.
    This primes your spine for both active and passive hydration during the night.

Try this for a few nights and feel the difference. It’s a strategy rooted in somatic intelligence — not guesswork.


🌀 Recovery Starts with Awareness

This is about more than hydration — it’s about being in your body enough to know what it needs and when.
If you’re curious how body awareness and healing are deeply connected, this Psychology Today overview of somatic therapy breaks it down beautifully. It echoes what we practice here — movement that starts with presence, not just position.


✅ Feel Different in the Morning — Not Just Rested

If you want to feel strong, tall, and fluid in the morning, you don’t need more sleep.
You need smarter pre-sleep recovery.

This approach is simple, targeted, and doesn’t take long. But it’s rooted in deep science and even deeper respect for the body’s rhythms.

🔗 Want help applying this to your specific structure?
Book a free 30–45 minute strategy call and we’ll walk through the right ELDOA and hydration approach for your spine.

Follow the Thread—Where Movement, Fascia, and Freedom Align

Find more insight, reflection, and fascia-informed care across the platforms where we stay connected:

Facebook

Blue Sky

Pinterest

Instagram

Youtube

Your Body Is Not a Tool: It’s a Tensegrity System

Mens Health. Your Body is not a tool - tensegrity system body

Your Body Is Not a Tool—It’s a Tensegrity System

Most men treat their body like a tool.
Use it. Push it. Sharpen it. And when it breaks—tape it up and keep going.

But what if that’s the wrong model?

What if your body is less like a hammer… and more like a suspension bridge?

🧬 What Is a Tensegrity Structure?

Tensegrity is a principle of architecture and biology that describes how a system holds its shape through tension and compression in balance.

In your body, that means:

  • Fascia suspends bones, not just muscles.
  • Muscles work in continuous loops—not linear pairs.
  • Stability comes from distributed force, not just strong joints.

This concept is well explored in tensegrity structures in the body, where bones float in a sea of soft tissue and movement is the result of dynamic relationships—not rigid levers.

When one area tightens or collapses, everything else has to adjust—sometimes with pain, sometimes with compensation.

🧠 The “Tool Mindset” Is Costly

Most men were taught to push through discomfort, to train harder, and to earn results through effort alone.

But this approach overlooks the systemic balance that your body depends on:

  • Strength in one plane + stiffness in another = injury
  • Big lifts without joint hydration = compression, not growth
  • No fascia prep = poor rebound and reduced circulation

Fascia doesn’t just wrap muscles—it governs how force travels through the body. Fascia’s role in structural balance is central to preventing overload and sustaining performance.

A tensegrity system doesn’t respond well to brute force. It needs strategy.

🔧 The Shift: From Hammer to Suspension Bridge

What if instead of forcing your body, you prepared it?

  • What if warm-ups focused on joint mobility and fascial hydration, not just heat?
  • What if your training helped restore balance before pushing capacity?
  • What if you saw self-care as performance insurance, not a luxury?

🛠️ ELDOA: Biotensegral Fitness in Action

This is where tools like ELDOA, myofascial stretching, and segmental reinforcement come in.

They create:

✅ Precise decompression
✅ Vector-aligned tension
✅ Functional hydration of discs and joints
✅ Endurance without compensation

It’s not flashy. But it works. And it lasts.

In fact, fascia-related dysfunction is often a root cause of training breakdown. Learn more about overuse injuries and movement compensation and how smarter prep can make the difference.

📣 Final Thought: Pride in Structure

During Men’s Health Month and Pride Month, the message is simple:

➡️ Pride in yourself starts with knowing yourself.
➡️ You can’t give what you don’t have.
➡️ A resilient body supports a fulfilling life.

The goal isn’t to push harder—it’s to train smarter.
Your body isn’t a tool. It’s a system. Treat it that way—and it will carry you far.

Want to experience what real body architecture feels like?

Follow the Thread—Where Movement, Fascia, and Freedom Align

Find more insight, reflection, and fascia-informed care across the platforms where we stay connected:

Facebook

Blue Sky

Pinterest

Instagram

Youtube

Katy G – When All Else Failed, She Tried Again And Succeeded

The big smile that Katy comes in with is always a joy to see. But situations with her body were trying to take that smile away. You see, 10 years ago, she was injured at work. The pain and limited activity were constant companions. 

She tried PT, Cranial Sacral, and all types of bodywork massage, including Rolfing, Feldenkreis, acupuncture, chiropractic, ergonomic office assessments, and yoga classes, and bought various DVDs specific to back issues. In 2023, I had spine surgery for sciatica and stenosis. She suspected her back would have been worse sooner without these efforts, but they didn’t fix matters.

Activities like gardening, bending, walking, and sitting were severely limited and painful. She had sciatica every day and neuropathy in her shin and foot. The walking distance was short, and her speed was slow. Sitting down really locked up her back and glutes. Standing was more comfortable. Lying prone with ice offered some relief.

Medicare cut off her PT five months after surgery, but she was still not okay. To make matters worse, and her more frustrated, PT had not helped much anyway. She was praying for direction when she saw an ad for a free SolCore Fitness trial class on Facebook (this is our Monthly Free ELDOA class).

She signed up online and attended the free Saturday group class, and since she found it so beneficial, then signed up for the 2-week trial to give SolCore Fitness a fair test. Ekemba Sooh did an assessment of my issues so he knows what is safe to do. Ekemba is active in class, hands-on, adjusting student postures, and he is very aware of our abilities and injuries. She also signed up for some individual sessions to include the manual therapy techniques because “I was desperate to get better.”

After six months of classes, she continues to improve. She walks better, moves easier, can sit longer, has reduced duration, is less frequent, and travels more efficiently. Since she continues to make progress, she is motivated to keep going and continue to improve her body, health, and life. So, She is sticking with the program that got her there.

SPECIAL OFFER
A Trial Without Any Commitment
START YOUR IN-HOUSE TRIAL NOW

Find out more @

Facebook

Blue Sky

Pinterest

Instagram

Youtube

Gardening. The Unwanted Effects On Your Body.

🌱 Gardening Hurts? How to Protect Your Body While Doing What You Love

Gardening brings joy to so many people — the satisfaction of growing your own food or flowers, the quiet peace of working in the soil. But for many, it also brings back pain, neck stiffness, sore knees, or overall fatigue. It doesn’t have to be that way.

I’m Ekemba Sooh, owner of SolCore Fitness. I’ve been in the health and fitness field for over 30 years, working under the osteopathic model. And here’s what I want you to know:

Gardening is a sport. It’s physically demanding. And like any sport, if you don’t prepare your body for it, you’ll pay for it.

In this blog, I’ll break down:

Simple things you can do to avoid injury and feel better

Why gardening leads to pain

What’s really happening to your knees, back, and spine

Click on the image to watch the video

🌻 Gardening is More Demanding Than You Think

Here’s what most people miss: gardening places a huge load on the body.

You’re squatting, bending, twisting, lifting, and often holding these positions for long periods. That’s a combination of:

  • External load (heavy pots, rocks, plants)
  • Postural load (static crouching, awkward angles)
  • Repetitive strain (hours of weeding, digging)

One of my clients — an art teacher — came to me years ago with chronic pain. After months of work, she felt great and was living her life again… until one weekend she gardened for five hours straight. No warm-up. No cool-down. She undid months of progress in one afternoon.

This isn’t about fear — it’s about awareness.


🦵 Your Knees: Why Squatting Hurts Later

Gardening involves constant squatting, both dynamic and static. The knee joint is most stable at 90 degrees — but once you drop lower, things start to rub.

A law in biomechanics called Delpech’s Law tells us that high pressure on a surface leads to the body producing more tissue. In the knees, this can lead to roughened cartilage, causing pain, grinding, and inflammation — especially if you do it over and over without support.


🧍‍♂️ Your Lower Back: Lever Arms & Fascia Fatigue

Ever notice how heavy things feel when you’re bent forward? That’s the lever arm principle. The further out the weight (or your torso), the more strain on your lower back.

From your belly button to your pelvis, you don’t have bones to hold things together. Your fascia — soft tissue layers — does the job. But fascia needs to be hydrated, supple, and trained to support load.

If your fascia isn’t prepped, long hours in bent-over positions can overwhelm it. That leads to tightness, spasms, or worse.


🌀 Your Spine: Why Flexing and Twisting Are Dangerous

Most gardening tasks involve two risky combinations:

  • Flexion + Rotation (scooping dirt, weeding)
  • Extension + Rotation (reaching up and twisting)

Both compress the spine’s joints and increase the risk of disc issues like bulges, herniations, or pinched nerves — especially if your spine isn’t stabilized by surrounding muscles and fascia.

This isn’t about avoiding movement. It’s about training your body to handle those movements safely.


🏋️‍♀️ What You Can Do to Prevent Gardening Injuries

Here are the three keys to keeping your body pain-free while gardening:

1. Train Like It’s a Sport

You wouldn’t try to deadlift 500 pounds without a program, right? Gardening is no different. Your body needs a holistic strength and mobility plan based on what you’re asking it to do — not just general workouts, but targeted prep for your spine, knees, pelvis, and fascia.

2. Warm Up Before Gardening

Your body is like an old car — it needs a few minutes to “rev the engine.” A proper warm-up turns on your muscular and neurological systems, thins out the fluids in your joints and fascia, and helps prevent injury.

Here’s a short warm-up that targets the most stressed areas:

👣 Knees

  • Knee Circles (clockwise and counterclockwise)
  • Figure 8s (vertical and horizontal)
    These gentle movements lubricate the joint and prep ligaments for squatting.

🧘 Pelvis

  • Pelvic Rocks in a wide-stance position with knees bent and torso upright. Helps activate the hips and lumbar spine.

🌀 Spine

  • Torso Translations & Tilts with arms in external rotation. Warms the ribcage and mid-back while protecting from over-compression.

Just 5–7 minutes of this can drastically improve how your body handles the demands of gardening.

3. Recover After Gardening

You’ve loaded the system — now you have to unload it. Stretch the areas you used. Use fascia-specific movements or myofascial stretches to rebalance the body. Don’t just sit down and let it tighten up.


🌿 Want to Keep Gardening for Life?

If gardening brings you joy, it’s worth protecting. And if you want help, I’ve got 3 easy ways to start:

Let me help you garden smarter, not harder — and keep doing what you love for years to come.

Building a foundation for a better life.

Find out more @

Facebook

BlueSky

Pinterest

Instagram

Youtube

Do You Know the Truth About The Bend Pattern?

Bending is one of the most common movements we use in everyday life—picking up your kids, moving a box, swinging a golf club. But most people don’t do it well. That poor movement adds up, leading to tightness, pain, or injury over time.

So should you jump straight into Romanian deadlifts (RDLs) or kettlebell swings to “fix” it?

Not quite.

Let’s unpack what the bend pattern really is, which muscle chains are involved, and how to approach this movement holistically so your body gets stronger—not more worn down.

Click the image to watch the full video

What Is the Bend Pattern, Really?

In training, the bend pattern refers to a hip-dominant movement like an RDL or deadlift. You’ll see this pattern show up solo or combined with other movements during everyday life—lifting, twisting, walking, squatting.

But just “doing” the movement doesn’t mean you’re doing it well.

If your muscle chains are out of balance—some tight, some weak, some misfiring—practicing the bend pattern without addressing the root causes can reinforce dysfunction and eventually lead to pain or breakdown.


The Bend Pattern Is a Global Movement

Unlike isolated exercises, the bend pattern is what we call a “global” movement. It requires the whole body to coordinate and act as one. That’s why I don’t just teach the movement—I assess how your body is functioning within the movement.

We look at the full chain: the muscles, fascia, tendons, ligaments, and how they interact.

The primary chain behind the bend pattern is your posterior chain—from your heel to your calves, hamstrings, glutes, deep back muscles, and even your neck and shoulders. But your anterior and lateral chains help stabilize that pattern too.

Here’s a quick snapshot of the key players:

  • Soleus
  • Gastrocnemius (calf muscles)
  • Hamstrings
  • Gluteus maximus
  • Four layers of spinal muscles
  • Trapezius
  • Rhomboids
  • Levator scapulae
  • Shoulder stabilizers

The Problem with Just “Doing” the Bend

Too often, people start loading up barbells without assessing the quality of their chain or how their fascia is functioning.

The bend pattern naturally places more mechanical load on the lower back than a squat—simply due to leverage. That’s not a bad thing. But it becomes a problem if:

  • You haven’t trained segmentally
  • Your fascia is out of balance
  • You’ve overloaded the system
  • You’re dealing with an acute back issue

Force isn’t the enemy. Misapplied force is.


How to Learn the Bend Pattern: Start Pure

To truly master this pattern, you must start with clean motor control. I teach the butt-back, bow-forward drill from a kneeling position. It’s the most stripped-down, brain-friendly way to teach your body how to move properly.

From there:

  1. Kneeling →
  2. Bodyweight standing RDL →
  3. Light weight →
  4. Full deadlift (hip + knee bend)

At each step, you’re grooving the right motor pattern—building a motor engram in your brain so you move properly without having to think about it.

Key pointers:

  • Keep a neutral spine (don’t over-arch or round)
  • Maintain all four natural curves in your back
  • Shift weight back into heels—but don’t lift your toes
  • Move as one unit—don’t break at the spine
  • Engage your abs and lats for support

Common Mistakes (That Will Wreck Your Back)

  • Rounding the spine
  • Overarching the lower back
  • Losing foot contact
  • Using too much weight too soon
  • Not progressing through proper training stages

Instagram might celebrate a rounded-back deadlift, but your body won’t. You want smooth, controlled, segmental movement—built over time with intention.


The Fascia Piece (Why It Matters)

Muscles don’t work in isolation. They’re wrapped in and connected by fascia—a living, communicative network that governs structure, neurology, and coordination.

If your fascia is dehydrated, compressed, or restricted, your body can’t move well—even if your muscles are “strong.”

Here’s what affects fascia health:

  • 🚰 Dehydration (aim for half your body weight in ounces of plain water daily)
  • 😰 Chronic stress
  • 🧍‍♂️ Not working the fascia directly (training in multiple planes and ranges)

Want a better bend pattern? Take care of your fascia first.


Deadlift vs. RDL

Once you master the RDL, you can layer in the deadlift by adding controlled knee flexion. The movement stays hip-dominant, but now you’re handling more force and range of motion.

Both movements are important—but only if you’ve earned the right to do them well.


Slow Is Smooth. Smooth Is Strong.

Building a bend pattern takes time. Don’t rush. Train your brain, train your chains, and train your fascia. It’s not about how much weight you lift. It’s about how well you move—now and for the rest of your life.


Want Help?

If you’re 40+ and looking to be strong, mobile, and pain-free for the long haul, I’ve got a few ways to support you:

All links are in the description below.

See you next week—take care.

— Ekemba Sooh
SolCore Fitness & Therapy

it’s not just working out, it’s building a foundation for a better life.

Find out more @

Facebook

Twitter

Pinterest

Instagram

Youtube

Is Hanging For Back Pain A Real And Safe Solution? 🧐

Back pain affects over 550 million people worldwide, and with that kind of number, it’s no surprise people are searching for relief—fast. One of the more popular trends? Hanging from a pull-up bar to decompress the spine. But is this method really helping, or could it be doing more harm than good?

Let’s break it down through a holistic, fascia-informed lens, so you can understand what’s really happening when you hang—and whether it’s a smart choice for your back.

Click on the image to watch the full video

🔍 Why People Hang for Back Pain

The theory is simple: when you hang, your body weight creates a gentle pull on the spine, which seems to decompress the vertebrae. It’s popular among physical therapists and fitness influencers who promote spinal decompression as a fix for bulging discs, tight backs, or just general discomfort.

But like most things in health and fitness, simple doesn’t mean effective—and it certainly doesn’t mean safe for everyone.


🚫 When Hanging Might Do More Harm Than Good

Let’s start by understanding what kind of back pain you’re dealing with. Here’s a simple breakdown:

  1. No pain – Fine for general feel-good movement
  2. Semi-chronic – Occasional flare-ups
  3. Chronic – Consistent daily discomfort
  4. Acute – Sharp, intense pain or injury

🔴 Acute or chronic pain? Avoid hanging. Your body is already inflamed and dysregulated. Hanging adds unpredictable force to an unstable system—it’s not specific, and it can worsen the problem.

🟡 Semi-chronic? Maybe—but only for brief relief, not correction.

🟢 No pain? You’re free to experiment, but don’t expect it to fix much.


🌀 What Really Happens When You Hang?

When you lift your feet and hang from a bar, your body wobbles. That instability triggers your core and spinal muscles to contract constantly in small ways just to keep you from falling.

That means instead of fully relaxing and lengthening your spine, your body is busy protecting itself. And contraction ≠ decompression.


📌 The Specificity Problem

Even if hanging did decompress the spine, it doesn’t target where you need it most.

Back pain often shows up in specific areas—like L4-L5, T12-L1, or T8-T9. But when you hang, your body moves where it’s already free and open—not where it’s stuck.

➡️ Correction requires specificity. If you can’t direct the force to the exact spinal segment in need, you’re just stretching the wrong places.


🪢 No Fixed Point = No Progress

To correct posture or decompress a joint, your body needs fixed points above and below the target area. Hanging removes that control. It’s like trying to stretch a rubber band without holding the ends.

You can’t direct the force. You can’t stabilize. You can’t be specific. And without that, no real change happens.


🔄 Twisting While Hanging? Please Don’t.

Some videos promote twisting your body while hanging. That’s biomechanically dangerous.

When you twist your spine under load (yes, hanging counts), you create compression, not decompression. The spinal discs and surrounding ligaments are not built to rotate freely under tension—especially not in a compromised state.


🏗️ Hanging Is a Closed Kinetic Chain

If you’re trying to create space in your spine, you need open kinetic chain movement—freedom at the end joint. But hanging is closed-chain. Your arms are fixed; your spine becomes the weak link under tension.

That’s the opposite of what you want if your goal is spinal decompression.


🔧 So What Should You Do Instead?

Back pain isn’t always caused by your back. Common culprits include:

  • Herniated or bulging discs
  • Pinched nerves or blood vessels
  • Structural imbalance
  • Weakness or asymmetry in trunk muscles
  • Poor fascial tension distribution

You need to balance strength and mobility across your entire structure. That includes your spine, diaphragm, abs, ribs, back muscles, and everything connected via fascia.

🧠 And most importantly—you must re-educate your body. Passive hanging doesn’t do that. You need specific exercises and postures that restore function, reduce compression, and create stability through proper alignment.


✅ Here’s What Works Better

  • ELDOA – Targeted spinal decompression with fascial tension
  • Myofascial Stretching – Postural rebalancing to relieve tension
  • Holistic Training – Programs designed to move you from dysfunction to function
  • Structural Assessment – To identify where to start and how to build safely

💬 Final Word: Hanging Feels Easy—But That Doesn’t Make It Effective

It’s tempting to think hanging can fix your back pain. It’s quick. It’s simple. But the body isn’t simple—it’s complex, interconnected, and intelligent.

If you want sustainable relief and a stronger, more mobile spine, don’t rely on hacks. Invest in your body’s full system.


🎁 Want Help?

Get started for free:

Let’s move beyond hacks—and help your body become something greater.

it’s not just working out, it’s building a foundation for a better life.

Find out more @

Facebook

Twitter

Pinterest

Instagram

Youtube

Unlocking the Power of the Squat Exercise

The squat exercise is one of the seven primal movements. But unlike the others, a properly executed squat is the only one that can directly improve your posture.

Most people learn to squat the wrong way. Fitness classes, trainers, and online videos often pass down bad form like it’s tradition. Challenges like “100 squats a day” only reinforce poor patterns. They don’t teach you how to move—they teach your body how to compensate.

That’s a problem.

Click the image to watch the full video.

Why the Squat Exercise Matters So Much

A squat isn’t just for building legs or glutes. It’s a global movement that involves your whole body working together. In fact, it’s made up of multiple smaller systems working in harmony—from your pelvic floor to your jaw.

Done right, it’s one of the most powerful tools you have for long-term strength, mobility, and posture.

Done wrong, it becomes a slow leak—wearing down your body over years until the damage is finally too loud to ignore.


Most People Are Taught the Squat All Wrong

When I started training back in my teens, I was told to arch my back, stick my butt out, and look up. It felt powerful—but it placed massive stress on my lower back and neck. I didn’t feel pain for years. But by the time I hit 35, that form had helped cause a spinal issue and sciatic pain.

That’s how compensation patterns work. You don’t feel them until they’ve done damage.

And unfortunately, a lot of fitness systems still teach that exact form today.


The Squat and Posture: A Unique Relationship

Unlike bending, pushing, or pulling, the squat uses and improves your posture—if done correctly.

Your postural system is made up of:

  • The Plumb Line (ear, shoulder, hip, knee, ankle alignment)
  • The Gravity Line (a 4-degree cone rising from your pubic bone)

The squat interacts with both. If your plumb line is off, squatting can make things worse. But if you squat with awareness and alignment, it actually helps reinforce your posture inside that gravity cone.


What It Takes to Do a Proper Squat Exercise

The squat is built from many parts. Each part needs to function independently before it can function together.

Here’s what that means:

✅ The Beam Phenomenon

Your torso needs to move like a solid beam—no wobble. That requires training your:

  • Pelvic floor
  • Abs (especially lower abs)
  • Diaphragm
  • Lats
  • Pecs
  • Fascia in the mouth and throat

✅ Foot and Ankle Mechanics

Your feet are your foundation. A weak or collapsed arch (especially at the navicular bone) throws off everything above. You may need arch support or proper shoes when lifting heavy.

✅ Pelvic Tuck and Knee Drive

A good squat is knee-dominant. That means knees move first—not hips.

At the same time, keep your pelvis tucked and chin tucked to stay in the beam. This requires both abdominal strength and fascial flexibility in the back.

If your soleus and calves are tight, your heels will lift and stop your knees from driving forward. So you may need to stretch and strengthen your calves to get full range.


Learning to Squat Means Slowing Down

If you’re constantly focused on performance or fat loss, you’re not giving your body the time it needs to learn proper form. And in a class environment, correcting your form often isn’t the priority.

That’s like trying to learn typing by mashing keys as fast as possible without learning the keyboard.

It’s not a matter of willpower—it’s just bad input. And bad input = bad output.


Good Squat = Good Life

Learning how to do a proper squat gives you a relationship with your body.

You’ll learn where you’re tight, where you’re weak, and where you’ve been compensating without even knowing it. And when you address those things, your body responds.

You get stronger. You feel better. You age slower.


Want Help With Your Squat?

I’ve helped thousands of people reconnect to their bodies through correct, holistic training. Here’s how you can start:

You’ve been given a body that can last 90+ years. The squat exercise is one of the best ways to take care of it.

Let’s make sure you’re doing it right.

it’s not just working out, it’s building a foundation for a better life.

Find out more @

Facebook

BlueSky

Pinterest

Instagram

Youtube

Lower back Pain: 3 BIG Reasons Why!

Are you searching for lower back pain relief? Googling lower back pain exercises, stretches, or massages? You’re not alone—lower back pain affects over 619 million people worldwide and is one of the leading causes of disability.

I know the frustration personally. About 16 years ago, I fell into that statistic. I tried doctors, PTs, chiropractors, acupuncture, yoga, Pilates—you name it. Some helped temporarily. Others made things worse. None gave me long-term results… until I took a holistic approach to my body.

I’m Ekemba Sooh, owner of SolCore Fitness in Santa Fe. I’m a SomaTrainer and SomaTherapist trained in a unique, osteopathic method of working with the body. After 30+ years in this field, I’ve helped countless people who were failed by symptom-focused care finally find relief—and get their lives back.

If you’re tired of lower back pain running your life, here are 3 major reasons you’re stuck—and what to do about it.

Click the image to watch

1. Poor Posture: Structure Dictates Function

Bad posture does more than look sloppy—it breaks down your entire system. Structure dictates function. That means your body only works as well as it’s aligned.

Having poor posture compresses joints, disturbs your fascia, restricts movement, and stresses your nervous system. And it’s not just about “standing up straight”—you need to stack your ear, shoulder, hip, and ankle vertically (plumb line), and be able to maintain that inside a 40° gravity cone.

If your posture’s off, everything else—training, therapy, diet—can only take you so far.

2. Bad Training: What Are You Actually Teaching Your Body?

Your body adapts to what you do—constantly. Whether you’re standing, sitting, or lifting weights, you’re always “training” it. The problem? Most people unknowingly teach their body to break down.

Take sitting, for example. It shortens and weakens your hip flexors and rotators, rounds your spine, and shuts off your glutes. This creates a chain reaction that leads straight to lower back pain. Most training programs don’t undo this damage—they reinforce it.

Effective training must be holistic and specific. You need to work not just the muscles that hurt, but the fascia and chains that surround them. That means targeted stretching, segmental strengthening, and spinal decompression like ELDOA—not generic “core” exercises or trendy workouts.


3. Bad Treatment Models: Are You Chasing Symptoms or Solving Causes?

Most conventional treatments focus on symptoms. You’re in pain, so you get pain meds, ice, or maybe some stretches on a sheet. That might help for a few days—but it doesn’t fix the cause.

Symptom-based care creates a cycle: Pain → Treatment → Temporary Relief → Pain Returns.

Cause-based therapy works differently. It asks:

  • Why did this pain start in the first place?
  • What movement patterns, lifestyle habits, or dysfunctions are at play?
  • What does your body specifically need to correct the problem?

In a cause-based model like mine, we assess how you move, how your spine functions, what your fascia is doing, and what your nervous system is compensating for. The goal isn’t just “feeling better”—it’s functioning better for life.


Bonus: Food, Hydration & Your Disc Health

Your lower back is only as healthy as what you feed it. Junk food, dehydration, and inflammation weaken your tissues—especially your discs. These shock-absorbing structures are 70% water. If they’re dehydrated, they shrink and lose strength.

Good food and proper hydration are not extras—they’re part of the solution.


So What Now?

Ask yourself:
Do you want to just feel less pain—or do you want to function better?

If it’s the latter, you need a program that:

  • Works holistically (not just locally)
  • Targets the cause, not just the symptoms
  • Evolves with your body over time

That’s the work I do. And if you’re ready, I’ve got a few options:

Lower back pain isn’t just about your back. It’s your posture, your habits, your beliefs, your biology. You can heal it—but only if you take a complete approach..

it’s not just working out, it’s building a foundation for a better life.

Find out more @

Facebook

BlueSky

Pinterest

Instagram

Youtube

Discover the Hidden Dangers of Anterior Pelvic Tilt

“Duck butt” might sound funny, but anterior pelvic tilt is no joke.

It’s a common postural issue where your pelvis tilts too far forward—and it’s one of the main reasons people suffer from chronic lower back pain, disc bulges, SI joint instability, and more.

I’m Ekemba Sooh, SomaTherapist and SomaTrainer. I had anterior pelvic tilt myself—and it played a major role in my L4-L5 disc bulge and sciatic pain. No trainer, therapist, or doctor ever told me the tilt was the root cause.

They were treating symptoms. Not the source.

Click on the image to watch

What Is Anterior Pelvic Tilt?

Your pelvis naturally tilts slightly forward to support upright movement. But anterior pelvic tilt happens when this angle becomes exaggerated and stuck—creating a “duck butt” posture.

This tilt disrupts your body’s alignment and sets the stage for chronic compensation patterns. Over time, these compensations become permanent dysfunctions.


How It Becomes a Problem

Your body is a biotensegrity structure—meaning it’s designed to distribute force efficiently across the entire system. If one area tightens or weakens, your body adjusts to keep you moving. That’s compensation.

Compensation isn’t bad at first. But if left unchecked, it snowballs into bigger problems:

  • Chronic lower back pain
  • Lumbar disc issues (bulges, herniations, stenosis)
  • SI joint dysfunction
  • Pelvic floor and organ dysfunction
  • Reduced performance and poor energy transfer

It all stems from the inability to attenuate force efficiently—because the structure is compromised.


What Causes Anterior Pelvic Tilt?

Too much sitting is a big culprit. It shortens the hip flexors (especially the psoas) and weakens the posterior chain (glutes, hamstrings, spinal stabilizers).

Over time, your body learns this dysfunctional position—and your nervous system adopts it as your default.

For some, it’s even genetic. But genetics just mean you have to be more intentional—not that you’re doomed.


Why Most Approaches Fail

Typical solutions focus on isolated muscles. But your body doesn’t work in isolation—it moves as an integrated system through fascia.

That’s why general exercise, yoga, and stretching routines often fail. You feel good temporarily, but your body snaps right back to the same pattern the next day.

Why? Because you didn’t train the fascia to support a new pattern.


The Real Solution: Train Fascia + Function

To fix anterior pelvic tilt, you need to retrain your entire structure:

  • Stretch the shortened hip flexors (especially the psoas)
  • Strengthen the weakened glutes, hamstrings, and back muscles
  • Activate fascia chains, not just muscles, to build intelligent, whole-body control

The best tools I’ve found for this are osteopathic-based etiology exercises—like the ELDOA and my full training system. These methods respect how the body actually works: as a connected, intelligent, adaptable structure.


When to Start? Now.

If you’re in your 20s or 30s—start now and prevent future issues.
If you’re in your 40s, 50s, or 60s—and already feeling pain—this needs to be your primary focus.

You can’t afford to ignore anterior pelvic tilt. It’s not just a posture issue—it’s a performance killer, a pain amplifier, and a hidden driver of long-term health problems.


What to Do Next

If this resonates, here are a few ways to go deeper:


Final Thought

Anterior pelvic tilt is a structural dysfunction—but it’s also an opportunity.

It’s your body’s way of asking for smarter input. When you respond with the right training, you’ll not only relieve pain—you’ll become stronger, more mobile, and more connected to your body than ever before.

Don’t wait until things break down. Train holistically. Train intelligently. Train to support the life you want to live..

Building a foundation for a better life.

Find out more @

Facebook

BlueSKy

Pinterest

Instagram

Youtube

The Surprising Truth About Iliopsoas Muscle Pain

If you’re dealing with iliopsoas muscle pain—sometimes called psoas pain—you’re not alone. The iliopsoas plays a critical role in how your spine, pelvis, and hips move… and when it’s tight, weak, or dysfunctional, it can cause low back pain, hip pain, bursitis, pelvic issues, and more.

But here’s the real problem:
Most people—and even many professionals—oversimplify it. They give you generic psoas stretches or strengthening exercises that don’t address the full picture.

Let’s change that.

Click on the image to watch

What Is the Iliopsoas Muscle?

The iliopsoas is a deep muscle made of multiple parts: the psoas major, psoas minor, and iliacus. It doesn’t just run from your spine to your hip—it has multiple attachments at the spine, pelvis, and upper leg, making it a true tensegrity muscle in the osteopathic model.

That means it plays a central role in connecting and coordinating movement between your upper and lower body.
It also means problems with your iliopsoas don’t stay localized—they can ripple out into your spine, pelvis, or even internal organs through fascial connections.


Why Basic Psoas Stretches Don’t Work

Search the internet and you’ll see the same stretch everywhere: kneeling lunge, arms overhead, arch the back, slide forward.

Sounds familiar?

Here’s what’s wrong with it:

  • It ignores the multiple fiber directions and attachment points of the iliopsoas
  • It reinforces poor spinal positioning and can compress the lumbar discs
  • It fails to address fascia, which is key for actual lengthening and balance
  • It’s based on basic anatomy—not the complex interconnections that actually matter

Worse, these stretches can aggravate spinal conditions and reinforce patterns that caused your pain in the first place.


A Holistic Way to Work With the Iliopsoas

To truly improve iliopsoas muscle function, you need a program that goes beyond muscle alone.

Enter Hill’s Muscle Model:

A true holistic approach includes:

  • The muscle itself
  • The fascia that supports and connects it
  • The ligaments and joints it influences

All three work together. You can’t isolate one and expect long-term results.


What I Do Instead

As a Soma therapist and trainer with 30 years of experience—18 under the osteopathic model—I help people move and heal holistically.

Here’s how I work with the iliopsoas:

  1. Normalize the fascia
    Fascia surrounds and runs through the psoas like a spiderweb. If it’s twisted or adhered, the muscle can’t function correctly. Manual therapy helps unwind these patterns.
  2. Myofascial stretching
    Instead of basic stretches, I use biomechanically precise postures that account for all attachments and fiber directions. These target the whole chain, not just one part.
  3. Postural release
    Sometimes, just hanging in a specific posture allows the psoas to release more deeply than any active stretch. I show clients how to do this safely and effectively.
  4. Strengthen it—correctly
    A tight muscle can also be weak. I use movement patterns that strengthen the iliopsoas in the right directions, based on how it truly functions.
  5. Address the surrounding system
    That includes spinal stabilizers like the transverse spinalis, longissimus, iliocostalis, and lats. Muscles don’t work in isolation—they work in systems.

Want to Try a Simple Postural Release?

Here’s a safe, passive way to begin releasing the iliopsoas:

  • Sit on the edge of your bed or a bench
  • Lie back and hold one knee to your chest
  • Let the other leg hang off the edge
  • Hold for as long as is comfortable
  • Switch sides

This gentle release works with the body rather than forcing it.


Ready for Deeper Change?

Most iliopsoas issues don’t get better with surface-level fixes.
You need to work with the cause, not just the symptoms.

If this resonates with you, I have a few resources:
Free ResourceTo Get Mobile, Get Out of Pain, and Live the Life of Your Dreams
Consultation – Want to work together? Book a time via the Calendly link

You’re capable of more than you think. Allow the process to change you—and you’ll be amazed at what your body can do.

Building a foundation for a better life.

Find out more @

Facebook

BlueSky

Pinterest

Instagram

Youtube